
If it wasn’t for the fact that ticks have a purpose in balancing the ecosystem, I would be fine if they went extinct.
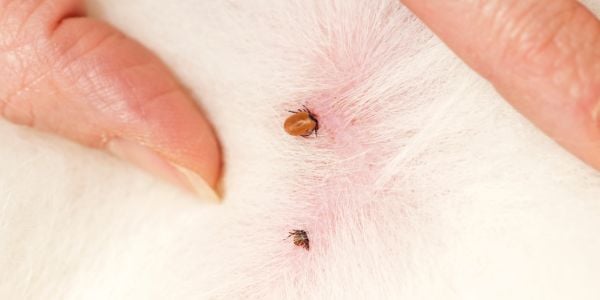
I mean, besides the fact that they are really gross (especially if engorged with blood), they can carry a host of diseases (e.g., Lyme disease, ehrlichiosis, tularemia, Rocky Mountain Spotted Fever) that they can pass along to your pets (and you) if they’re allowed to stay attached.
Did You Know?
- The most deadly tick-borne disease in the world for people is Rocky Mountain Spotted Fever (RMSF).
This bacterial disease is spread through the bite of an infected tick (American dog tick) and can progress, in days, to a serious and life-threatening condition (fatality rate can exceed 30–40%).
This disease is also potentially fatal to dogs (between 1% to 10% of infected dogs). - In five states (North Carolina, Tennessee, Oklahoma, Arkansas, and Missouri), more than 60% of reported cases of RMSF occur.
- Cats will test positive for RMSF, but they do not appear to develop noticeable signs of the disease.
So, what’s the best way to remove a tick from your dog or cat?
Note: As you can see, I wrote "or cat." Many pet owners assume cats don’t have issues with ticks like dogs because they remove them when grooming. While their abrasive little tongues may get some, they likely are not removing all the ticks.
Additionally, the ticks may be in areas your cat cannot reach during grooming.
I’m going to outline the process below, as well as provide some handy tools and tips to help you even further.
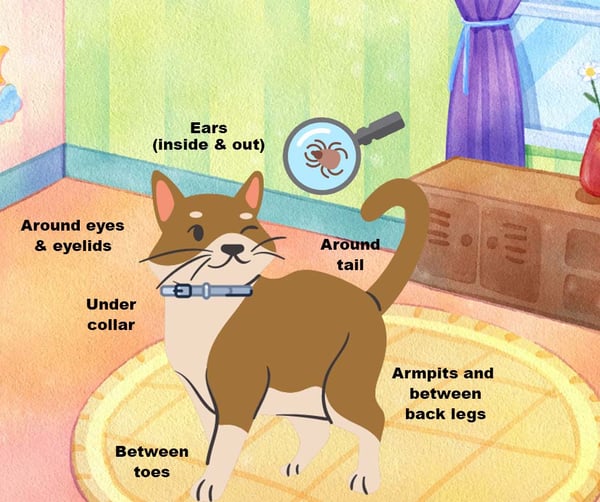
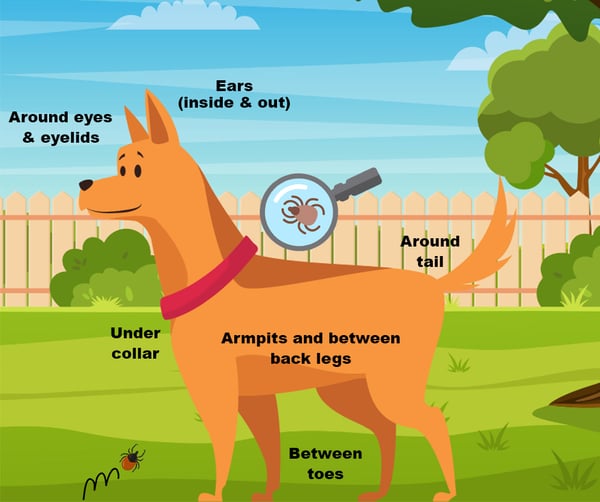
How to Find Ticks on Your Pets
Before you can remove a tick, you need to know where they like to hang out on your pet’s body. Ticks tend to like to hide in warm, moist areas.
The ‘common’ locations to find ticks on your pet include:
- Ears, both in and around
- Eyelids
- Around the tail
- Under their collar
- Between the digits (toes) of any paw
- Armpits
- Groin
While the above are the more common locations for ticks, they can be anywhere on the body. Therefore, it is important to gently feel, with light pressure, ALL OVER your pet’s body for any small bumps.
Things to Avoid When Removing Ticks
There are a couple of things you definitely don’t want to do, or at least try to avoid doing, when removing a tick from your pet.
Don’t try to remove an attached tick by burning it with a match, smothering it with Vaseline®, or painting it with nail polish. I've known pet owners who tried all of these methods!
None of them will work, but rather cause the tick to stick around longer than desired, and the whole match thing … yeah, those don’t go well next to fur and skin.
Avoid squeezing the body of the tick when handling it or trying to remove it. Doing so can cause “regurgitation” of the nasty and disease-causing bacteria, protozoa, and other microorganisms from the tick’s gut into your pet’s bloodstream.
And these could be the very disease-causing agents you’re trying to protect your pet from in the first place.
Don’t wiggle or jerk the tick to remove it. By wiggling or twisting the tick, you increase the risk that the head or mouth parts will break off and remain in your dog or cat's skin.
Avoid leaving the head in. There is an increased risk of infection if the head is left embedded in the skin.
Don’t handle the tick with your bare hands. Ticks don't just transmit diseases to cats and dogs! Depending on the tick type and disease they might be carrying, you could be at risk as well.
Wear exam gloves when removing ticks to stay as safe as possible. Studies have shown that removing ticks with tweezers instead of other methods (such as bare hands) protects against complications and infections.
Not all ticks carry disease, but unfortunately you can't tell until the tick is removed and assessed. Most tick-borne disease are transmitted to pets after the tick has been attached for at least 3–96 hours, depending on the disease they're carrying.
See the list below for transmission timing based on some common diseases.

How to Remove a Tick
Now that we’ve got the main “don’ts” out of the way, here are the things you DO want to do when removing a tick from your cat or dog.
If you don’t feel comfortable removing the tick yourself, please bring your pet to their veterinarian to have it done. Believe me, many, many pet owners do this, and the veterinary staff knows how to safely and completely remove the tick.
Use a Tick-Removal Tool
Use a tick-removal tool (your best and easiest option) or a good pair of fine-tipped tweezers or curved hemostats to remove the tick from as close to the skin (and the tick’s mouthparts) as possible.
If using one of the tick removal tools, be sure to follow the instructions on the packaging for best use.

If using tweezers or hemostats, grab the tick’s head as close to your pet’s skin as possible without pinching the skin. If the body is engorged with blood, be careful not to ‘pop’ the tick by grabbing the body and not the head. This would be a good instance where taking your pet to the vet is a good idea.
Pull it out slowly and gently with steady traction straight up. Don’t twist, jerk, or wiggle the tick. Watch the video below to see how:
Clean Your Pet's Skin
Clean the area of your pet’s skin from where the tick was removed. What you’ll use will be impacted by where on their body the tick was attached, as you’ll be limited to just water if it was near the eye or other sensitive areas.
For most other areas on the body, a gentle scrub with an antiseptic scrub like Hibiclens or Povidone Iodine is best. Warm, soapy water (use fragrance-free and antibacterial soap) can work in a pinch, too.
Keep the Removed Tick in a Container
Put the removed tick in a secure container, jar, screw-top vial, or Ziploc® bag. Do not place the tick on tape or wrap it in layers of folded tissue.
The purpose of saving the tick is for tick identification, should it become necessary. As different ticks transmit different diseases, even the developmental life stage of the tick — larva, nymph, adult — can impact the likelihood of it spreading disease.
You'll want to keep the tick in order to show your veterinarian.
Since damaged or dried ticks can’t be tested, place a slightly moistened cotton ball or a dampened piece of paper towel in the container with the tick.
You do not want it too wet. Do not preserve ticks in alcohol or saline.
Place the container inside a sealable sturdy plastic bag (be sure to close the containers or bags completely).
Store the container in a cool place (such as a refrigerator).
If you’re not noticing any concerning signs – see what these signs are below – after 4 weeks, you can discard the tick. If you are seeing concerning signs in your pet, then bring them and the tick(s) to your veterinarian for evaluation and testing.
Wash Your Hands
Even though you were wearing gloves during the removal, it's a good idea to thoroughly wash your hands.
Keep an Eye on Your Pet
Keep a close eye on your pet following tick removal, both the site on the skin from where the tick was removed and also just generally with their appetite, energy, limping, or other concerning changes.
Changes in the way your pet is eating, drinking, acting, or getting around could be related to the tick and should be checked out by your veterinarian. Usually, such signs, if related to the tick, are observed within 1 to 3 weeks.
Possible Symptoms of Tick-borne Diseases
- Fever
- Decreased appetite
- Decreased energy
- Enlarged lymph nodes
- Joint /Muscle pain
- Lameness
- Bruising
Check out our article for specific symptoms for each of the common tick-borne diseases.
Note that it typically isn't recommended to treat a dog with antibiotics just because they've been exposed to ticks, as there are many factors involved in whether or not the dog will become clinically infected with the Lyme disease-causing bacteria or any other pathogens.
That said, if you're overly concerned, you can always bring your dog (and the tick) to your vet when you first notice/remove the tick and discuss options and recommendations with your veterinarian then.

Where Are Ticks Found?
Ticks are found all across the country, though the type(s) of ticks that are most common will depend on the geographical region and the environment you're in. Here's a CDC map that shows the typical distribution of many different tick species throughout the United States.
During warmer months – April to September – is when most ticks are most active, but they can be encountered year-round. Ticks are even present during the winter!
Ticks are most commonly encountered in woodlands, weeds, brushy areas, and tall grasses, including sand dunes with tall beach grasses. Hiking with your pets and camping with your pets in the woods is a prime time for being exposed to ticks since they like the weedy edges of paths and trails, especially in areas with abundant wildlife.
There are different ways in which ticks find their hosts (your pet or you!):
- They detect a host’s breath
- They detect body odors
- They sense body heat, moisture, and vibrations
- Shadows are recognized by some species
Tick-borne Disease Transmission
It is during the process of feeding when ticks transmit the pathogens that cause disease.
The time taken (10 minutes to 2 hours) to prepare to feed is dependent on the tick species and its stage of life. Once the ideal location is selected, the tick will grasp the skin surface and cut into it. It then inserts feeding tubes into the skin. Your pet or you don’t feel this because the small amounts of saliva they secrete have anesthetic properties.
Ticks are difficult to remove because the feeding tubes have barbs, and some species of tick secrete a cement-like substance over them to hold the tubes firmly in place during feeding.
For several days, if allowed to remain attached, the tick will slowly suck blood. Infected ticks can spread pathogens through small amounts of saliva that are released during feeding.
The attachment time prior to disease transmission varies among the different tick-borne diseases (see examples below), and in some cases, the exact time until transmission starts isn’t fully known.
Since you likely don’t know what the tick is prior to removing it, as well as the different pathogens it is carrying, the best practice is to examine your pet daily for ticks and remove any and all ticks as soon as you see them.
Tick Attachment Time for Transmission of Disease
Ehrlichiosis and Rocky Mountain Spotted fever can be transmitted within 3 to 6 hours following attachment, but can take up to 96 hours.
Babesiosis transmission has generally been considered a slower transmission (2 to 3 days) as compared to other tick-borne pathogens, but one study found it to occur within 8 hours.
Anaplasmosis transmission occurs 24 to 48 hours after attachment and feeding begins.
Lyme disease requires 24 to 48 hours of feeding before a host is infected.

Watch for Ticks and Use Preventatives
If you’ve found a tick (or several) on your pets, it means that ticks are in your environment. Be vigilant about checking your pets (especially after outdoor trips) and yourself for ticks regularly, and take precautions to keep ticks out of your yard.
Also, talk to your veterinarian about safe and effective tick preventatives for your pets. There really are some safe, highly effective, and easy-to-administer tick preventatives for pets available these days! Read more tips for preventing tick-borne diseases.