
Build your own cat condo using our blueprint (download below) as your guide, or as inspiration for your own.
How To Build Your Cat Condo
Create a blueprint
Make sure you have all items and tools necessary
Cut all of the holes for your cat condo
Secure your individual boxes with duct tape
Secure finished condo to wall with duct tape
Cut out any additional holes for outside access
What You'll Need to Build Your Cat Condo
- Cardboard packing boxes. I used 25 for my cat condo, but you can adjust this number depending on how large you want the condo to be.
- Duck tape (two rolls) — this one even has cat faces on them!
- Packing tape (two rolls) — This tape is only necessary if you are using the boxes I used and not storage boxes with lids!
- Utility knife - If you don't have a utility knife, get this one (actually sold as a pair — but worth having a couple around the home)! They make cutting holes much easier than using scissors.
- Patience and a sense of humor (unfortunately not sold in stores)
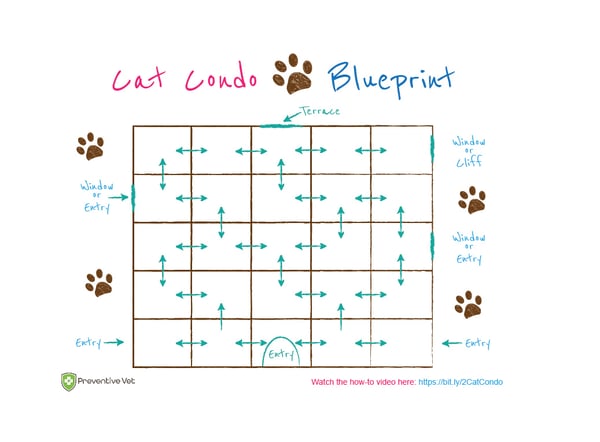
Creating a Blueprint
Before I started I found it incredibly helpful and time-saving to go in with a plan. Since I am not an engineer, I wanted to make sure that I wouldn't screw this up! Making a blueprint of the design was essential for my success. It doesn't have to be elaborate or extensive, but should show the directions that you want the holes (trust me it will make it so much easier when you are cutting the cardboard).
Pro Tip: After you have made your blueprint, but before you cut a single hole, remember your blueprint will show specific patterns that you will be following (for example, 12 boxes will have a two holes-opposite sides, 5 boxes will have two holes-connecting sides, and 8 boxes will have three holes-two opposite and one on top or bottom). This makes it much faster when you are cutting, so there's no guessing work and will make the stacking step quicker.
To download a free cat condo template that Chris and his family used, click on the image below and a new window will pop up with the PDF for you to download.
Safety First! Make Sure to Secure Your Cat's Condo
Once you get done stacking just make sure you use duct tape to secure all of the boxes together. After that it's important that you secure all of the boxes to the wall with duct tape as well. Remember that the final structure can be as big or small as you decide it to be for the space available. It's most important to make sure that whatever the size, the type of boxes you use are solid and the structure is secured together and to the wall.
Get the Family Involved!
And by all means, recruit help! My kids were very enthusiastic with ideas for decorating and toy distribution. Most importantly have fun, be patient, and remember that accidents are just opportunities! If you do all of this, it should take you about an hour ... Good Luck!!

